Managing user groups
Alfresco comes with two default user group called EVERYONE and ALFRESCO_ADMINISTRATORS. The EVERYONE group logically includes all the system users irrespective of the groups they belong to. This is useful to give read access to EVERYONE on certain common spaces for example, HR Policies and so on. You can create and manage your own groups. In order to create groups, log in to Alfresco Explorer as an administrator. ALFRESCO_ADMINISTRATORS group by default includes admin user. If you want to give multiple users admin rights then add the users to this group.
Creating groups and subgroups
Before adding a group or subgroup (hierarchical groups), you will need to finalize group names. The group name (identifier) should be unique and cannot be changed once set.
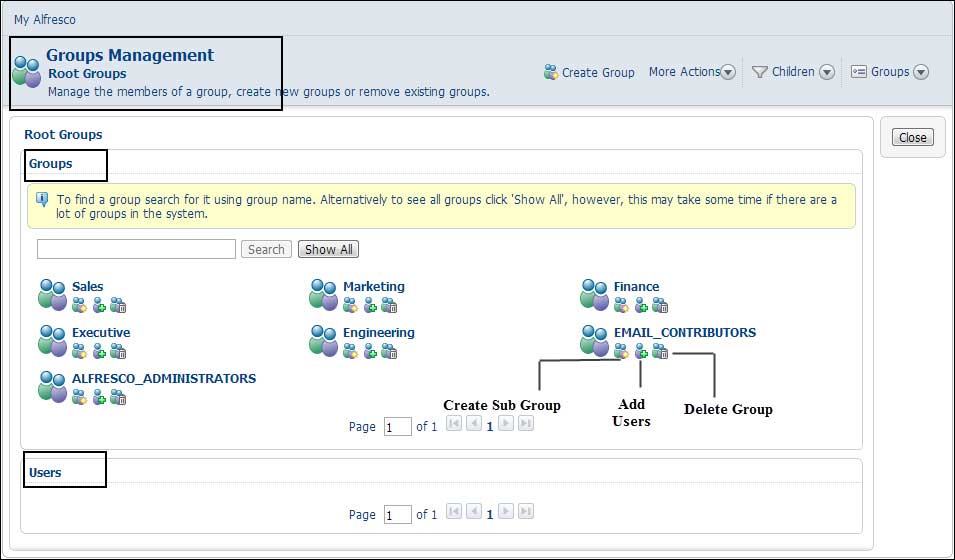
Refer to the first figure for the list of groups to be created for your intranet. Follow the given steps to create a group:
- In any space, click on the administration console icon. The Administration Console pane appears.
- Click the Manage User Groups link. The Groups Management pane appears.
- In the header, click Create | Create Group. In Create Group Wizard specify Executive as Group Identifier, the group used for all company executives. Click on Create Group button to confirm.
Similarly, create all the groups listed in the first screenshot except Administrator (which is already created out-of-the-box).
Note
Do not proceed to the subsequent sections without creating the groups. Remaining sample solution relies upon the existence of these groups for security and collaboration.
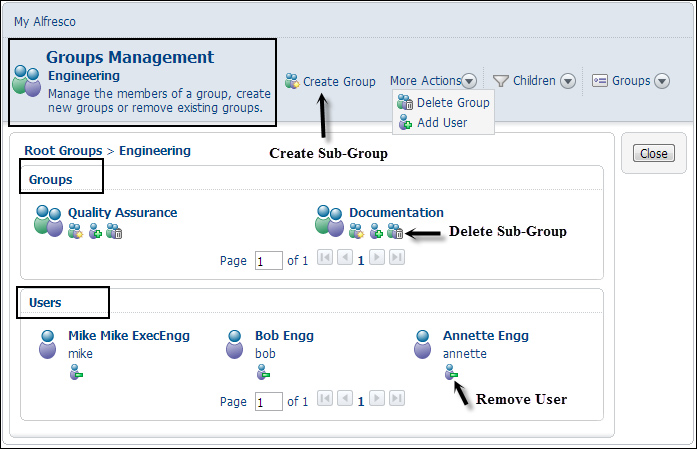
Click on the Engineering group and create two subgroups called Quality Assurance and Documentation.
Now you can see the groups at root level as shown in the following screenshot. You will notice that Quality Assurance and Documentation are not part of root-level groups, as they are subgroups under the Engineering group.
Adding users to a group
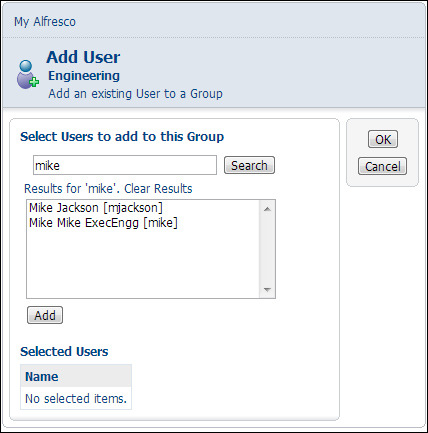
To add users to a group, click on the Add Users icon as shown in the above screenshot. The Add User dialog will pop up. You can search for the system users and add them to a group as shown in the next screenshot. Click on the Finish button to confirm the operation.
Add users to the newly created groups as explained in the first screenshot. For example, add user Jane HR to Human Resource group. Add user Mary Comm to Corporate Communications group. Similarly, add user Joe EnggQA to Quality Assurance subgroup of Engineering group, and so on.
Removing users from a group
Users can be removed from a group by clicking on the Remove User icon as shown in the following screenshot.
A user may belong to one or more groups. If the user got deleted from the system users list, then that user will be automatically removed from all the groups.
- WindowsServer2012Hyper-V虛擬化部署與管理指南
- 高性能Linux服務(wù)器構(gòu)建實(shí)戰(zhàn):運(yùn)維監(jiān)控、性能調(diào)優(yōu)與集群應(yīng)用
- 嵌入式操作系統(tǒng)(Linux篇)(微課版)
- Windows Vista融會(huì)貫通
- 高性能Linux服務(wù)器構(gòu)建實(shí)戰(zhàn):系統(tǒng)安全、故障排查、自動(dòng)化運(yùn)維與集群架構(gòu)
- 嵌入式系統(tǒng)原理及開發(fā)
- 突破平面3ds Max動(dòng)畫設(shè)計(jì)與制作
- OpenSolaris設(shè)備驅(qū)動(dòng)原理與開發(fā)
- 新編電腦辦公(Windows 10+ Office 2013版)從入門到精通
- Windows 7實(shí)戰(zhàn)從入門到精通
- Windows 10從新手到高手
- 從零開始學(xué)安裝與重裝系統(tǒng)
- Windows 8完全自學(xué)手冊(cè)
- 大規(guī)模Linux集群架構(gòu)最佳實(shí)踐:如何管理上千臺(tái)服務(wù)器
- 分布式實(shí)時(shí)處理系統(tǒng):原理、架構(gòu)與實(shí)現(xiàn)