- Mastering Articulate Storyline
- Ashley Chiasson
- 1019字
- 2021-07-14 11:19:15
Adding interactivity and extending slide content
Interactive learning is a pedagogical approach that tends to emphasize interactivity as a means of engaging learners instead of having them passively absorb information. Instead of sitting on a desk and listening to an instructor drone on, filling the brain (the bank) with knowledge, learners are encouraged to engage with the course content by using interactive elements to discover or reinforce their knowledge.
Loosely, interactivity in e-learning may be viewed as anything that requires the learners to interact with components within a lesson, module, or course. Storyline provides a wealth of options when it comes to adding interactivity to your stories, such as buttons, markers, motion path animations, and sliders, just to name a few.
Extending slide content is just as it sounds–extending the content on the main slide, without having to use multiple slides to convey the same information. In Storyline, you have many options for easily extending slide content, such as using layers, scroll panels, or markers, just to name a few.
Some options for extending slide content can also be considered interactive elements. For example, the use of scroll panels requires learners to use their mouse to scroll through textual or visual content. Some other examples of interactivity used to extend slide content could be buttons that trigger additional layers or markers used to highlight areas on a screen and reveal additional content.
Regardless of how you wish to add interactivity to your story, Storyline has functions to meet most all of your interactivity needs.
Working with slide layers
Slide layers are a great way of extending slide content without having to create a new slide. These layers act as an extension of the base layer, essentially layering on top of the base slide layer. We'll be talking a bit more about layers in Chapter 3 , Creating a Content-Rich Story, so this section will serve to jog your memory about layer basics.
Using the Slide Layers panel, you can easily add, duplicate, copy, paste, or delete layers. If you want to extend your base layer content by adding additional content, you can create a new layer that houses the additional content. In the following example screenshot, you will see that three layers, in addition to the base layer, have been created, and these layers contain additional information on the topic being discussed:
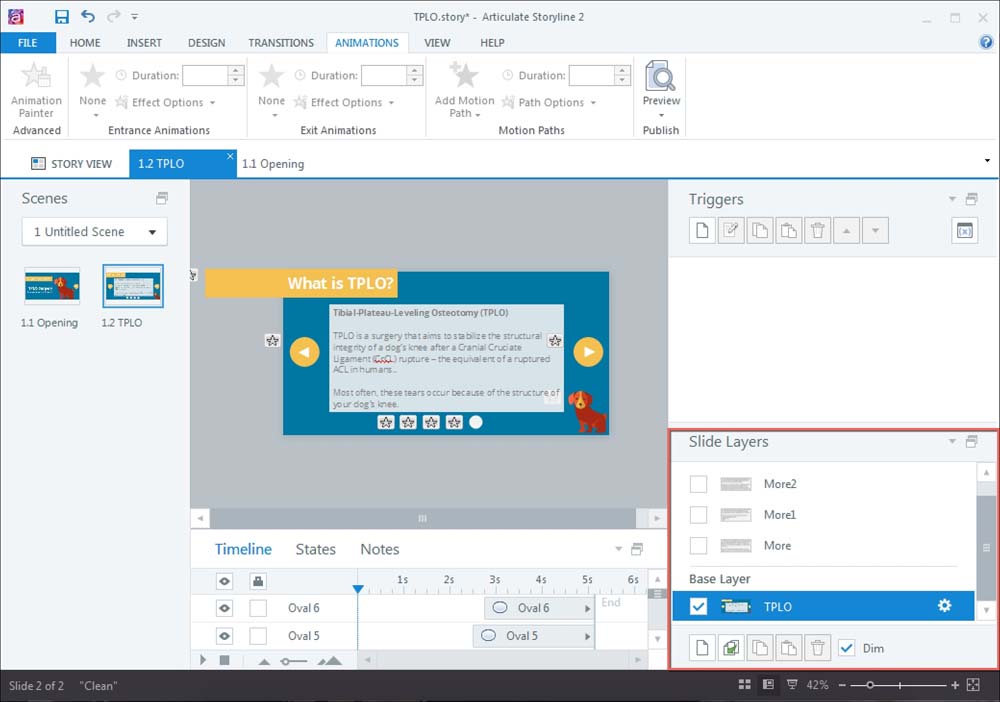
In order to get these layers functioning, you will need to apply triggers, which will be discussed next.
Working with triggers
Triggers allow you to set behaviors and dictate how a slide object behaves. You can apply triggers to most slide objects, and most elements of interactivity in Storyline will require trigger application.
You can easily create, edit, copy, paste, delete, and sequence triggers using the Triggers menu:
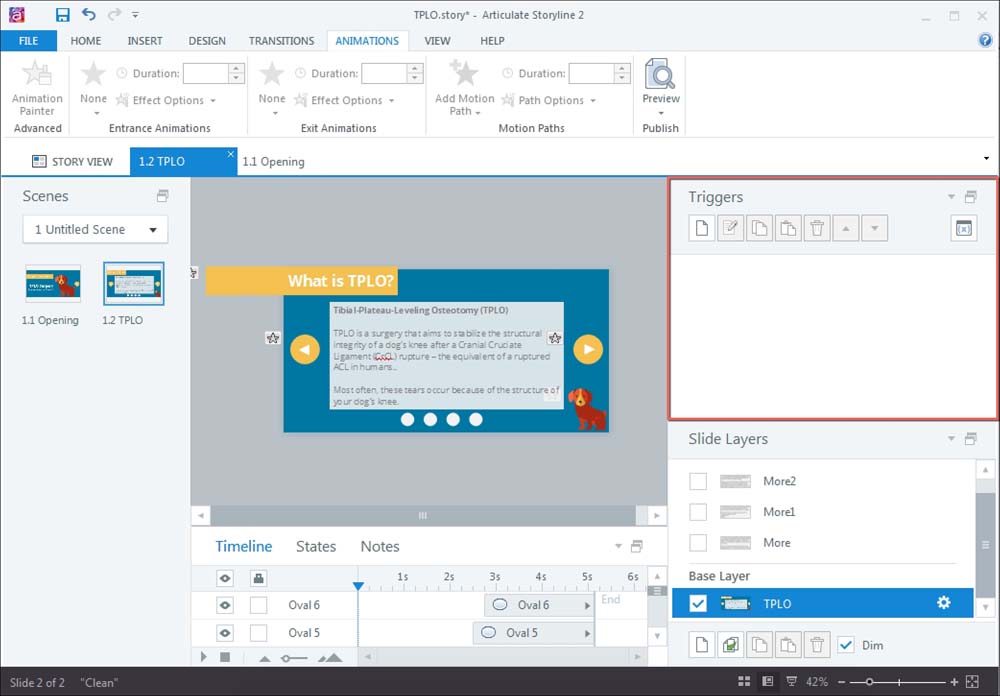
Let's go back to the slide layers we created. In the preceding screenshot, you'll notice there are no triggers. In order for the content in these layers to be displayed, we'll need to add some triggers. In this case, the triggers will be applied to the circular buttons below the main block of text in the screenshot.
To do this, you'll want to select the desired, circular button and create a new trigger. The Trigger Wizard will appear, and you will want to specify the Action (Show layer), the Layer (in this case, More), When the action will occur (when the User clicks), and the Object that will initiate this action (Oval 3), as shown in the following screenshot:
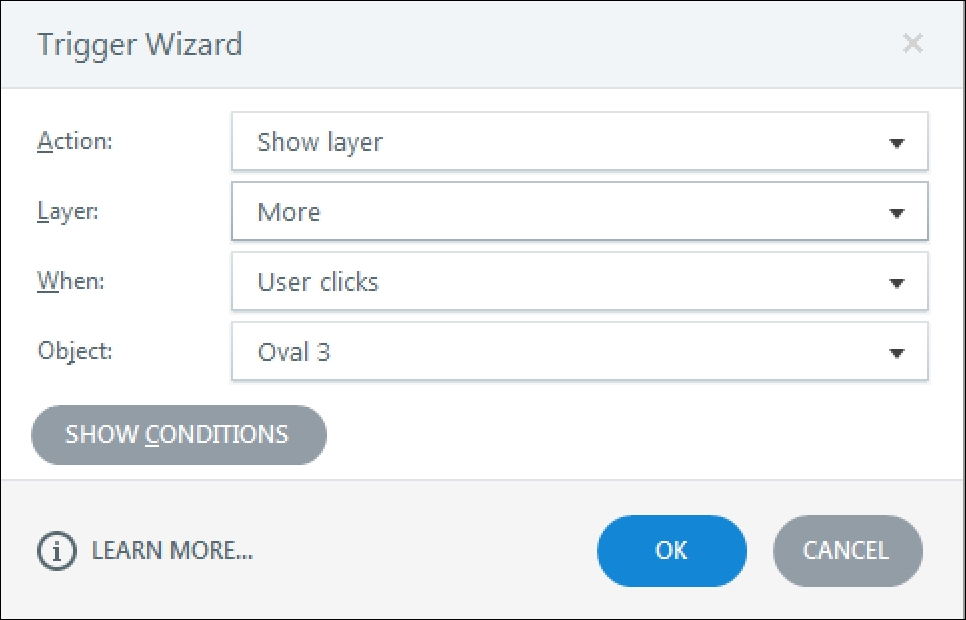
When the user clicks on Oval 3, the content on the More layer will be displayed. We'll discuss triggers in greater detail in Chapter 4 , Engaging Your Learners with Interactivity.
Working with states
States are a function in Storyline that provides slide objects with some more pizzazz than just staying in the normal, static, state. Within Storyline, you can create your own states and control these states using triggers or you can use the built-in states that Storyline provides.
Built-in states can be a huge time saver, and Storyline has 10 built-in states:
- Normal
- Hidden
Tip
Hidden is a built-in state in Storyline 2
- Hover
- Down
- Visited
- Selected
- Disabled
- Drop Over
- Drop Correct
- Drop Incorrect
Note
Characters have their own collection of built-in states to change expressions.
These states can be used without having to program triggers to change the state. One example is the Selected state. When the user clicks on the object that has the Selected state, you will see the result dictated by the state. Again, this is just a refresher. You'll be exploring in more detail the topic of states in Chapter 3 , Creating a Content-Rich Story.
Exercise 2
Let's take a look at Exercise 2. In this exercise, we'll be creating a custom select state for the oval-menu slide objects. This exercise illustrates how to easily add new states using the built-in states:
- On the Exercise 2 slide, click on Oval-Menu1 and then select States (between Timeline and Notes) to view the States menu. You'll notice there is only one state: Normal.
- We will be creating a new state. To do this, select Edit States and then select the New icon; the Add state menu will appear.
- From the drop-down menu, choose Selected and click on Add. Your Selected state will be added. It will look the same as the Normal state until you style it.

- From the Format tab, style the shape however you prefer, and when finished, select DONE EDITING STATES.
- In this exercise file, we have four oval-menu shapes. So to apply the same Selected state to all four oval-menu shapes, simply select the oval-menu shape that already has the Selected state applied, and from the Home tab, select the Format Painter and click on an oval-menu shape that does not have the Selected state applied.
- Your exercise slide should have progressed from the Before slide to the After slide in the
Exercise 2file. When you preview your slide, you should see the oval-menu shapes change formatting when selected. If you preview the After slide, you will see that when selected, the oval-menu shapes change color.
- Python科學計算(第2版)
- Mastering Zabbix(Second Edition)
- Learn Swift by Building Applications
- 重學Java設計模式
- Kotlin從基礎到實戰
- 從零開始學C語言
- MINECRAFT編程:使用Python語言玩轉我的世界
- Python趣味編程與精彩實例
- 零基礎學C語言(升級版)
- PHP 8從入門到精通(視頻教學版)
- 官方 Scratch 3.0 編程趣味卡:讓孩子們愛上編程(全彩)
- PHP+MySQL Web應用開發教程
- Learning ECMAScript 6
- PHP 7 Programming Blueprints
- Spring Boot 3:入門與應用實戰