- Mastering Adobe Captivate 7
- Damien Bruyndonckx
- 581字
- 2021-07-19 18:15:43
Automatic and manual panning
In the movie industry, panning refers to moving the camera during filming. In Captivate, the camera is the red recording area. When panning is turned on in Captivate, it simply means that the red recording area can be moved during the shooting. This enables you to shoot a bigger application with a smaller recording area.
Earlier in this chapter, we had a discussion on how to solve the project-sizing problem. Panning was one of the possible approaches. Let's take a closer look at it:
- Close and reopen AME to reset the user interface.
- Delete all the
.flvfiles present in thevideos/MOVfolder of the exercise. - Return to Captivate and navigate to the File | Record New Software Simulation menu item. The Captivate interface disappears and the red recording area shows up.
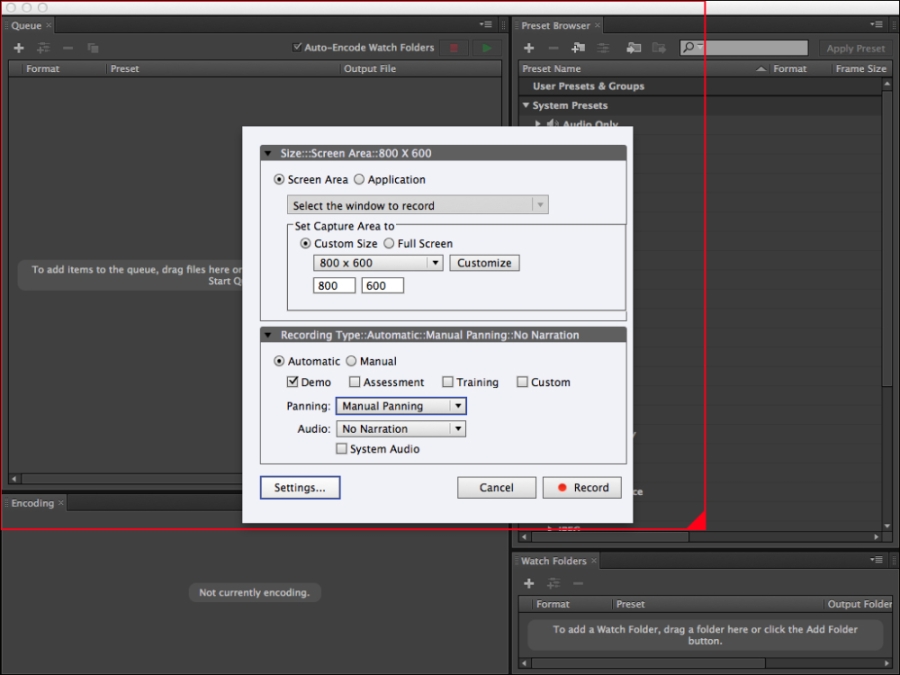
- In the recording window, choose to record a Screen Area (and not an Application as before). Give the area a Custom Size value of 800 x 600 pixels.
Normally, the size of the Adobe Media Encoder application should still be 1024 x 768 pixels from the previous filming sessions:
- Move the red recording area such that its top-left corner corresponds to the top-left corner of the Adobe Media Encoder application window.
In this configuration, the size of AME does not match the size of the red recording area. The recording area should be smaller than the AME:
- In the bottom part of the recording window, make sure the Demo mode is the only one selected.
- In the Panning drop-down list, choose Manual Panning.
- If necessary, set the Audio drop-down option to No Narration.
Your computer screen should look like the following screenshot:
- When ready, click on the red Record button to switch to the recording mode.
- After the countdown, perform the first few steps of the scenario in the Adobe Media Encoder application.
- When the Export Settings window opens, place your mouse above the red line of the recording area until the mouse turns into a grabbing hand. Then, slowly move the red recording area until it covers more or less the lower right-hand part of the Export Settings window.
- In AME, modify the size of the video as defined in the scenario.
- When the Export Settings dialog closes after you clicked on the OK button, move the red recording area back to its original position.
- Click on the Start Queue button (the green Play icon) as defined in the scenario.
- When done, hit End (Windows) or cmd + enter (Mac) to return to Captivate.
- When the project loads in Captivate, use the Preview icon to preview the entire project. Can you see the panning movements in the Preview pane?
- When the movie is finished, close the Preview pane and save the file as
Chapter02/encoderDemo_panning.cptx.
Back in Captivate, take a look at the Filmstrip panel. Beneath some of the slides thumbnails, you should see the Camera icon indicating that there are some Full Motion Recording slides in the project. Full Motion Recording is used to reproduce the panning movements made during the capture.
In this example, you have used manual panning. When using automatic panning, Captivate places the mouse at the center of the red recording area. During filming, the red recording area automatically follows any mouse movement. Automatic panning produces a lot of unnecessary movements, and, consequently, a lot of extra Full Motion Recording slides.