- Blender 3D By Example
- Oscar Baechler Xury Greer
- 639字
- 2021-06-24 16:08:47
Blender 2.8's user interface
When you first launch Blender, you will see the Splash Screen. This screen will show you what version of Blender you are using. It will display a piece of artwork made with Blender, and it will let you open project files that you've recently been working with:
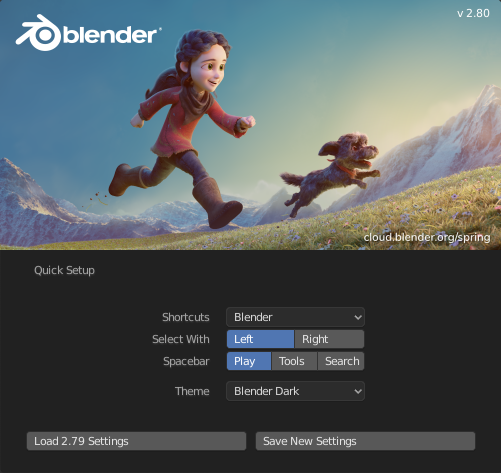
If this is your first time launching Blender 2.8, it will also ask you to choose which mouse button you would like to select objects with: left or right.
In previous versions of Blender, the default was to select objects in the Viewport with the right mouse button. Many users found this strange, so in 2.8, the new default is to use a left-click to select objects (you can change this at any time through the user preferences menu).
Believe it or not, right-click is more ergonomic in this context; your hand won't get as tired if you use right-click to select. It sounds weird, but you should give it a try! From this point on in this book, selecting objects will simply be referred to as "click to select" so that you can follow along with either a left-click select or right-click select.
When you're finished with the Splash Screen, click anywhere outside of it to dismiss it.
Blender's UI is highly customizable. By default, it is broken up into six distinct areas, as highlighted and numbered in the following image:
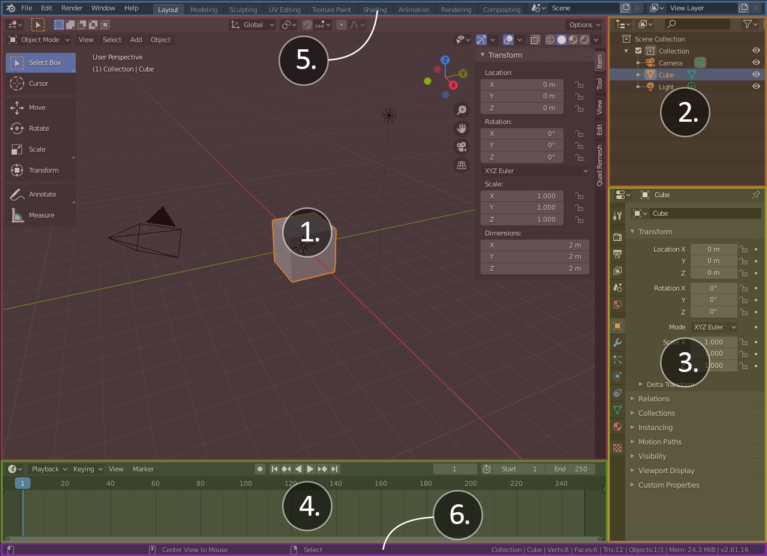
The four largest areas in the center of the UI are called editors. Each editor presents us with a specific way of visualizing our 3D project. There are many types of editors, but these four are open in the default workspace:
- 3D Viewport: The 3D Viewport is where we will be spending most of our time. It is our window onto the 3D scene. Nearly all of our 3D modeling is done here.
- Outliner: The Outliner lists all of the objects in the project and helps us organize our scene.
- Properties: The Properties panel contains the render settings and lets us add advanced modifiers, constraints, particles, physics, and materials to our 3D models.
- Timeline: The Timeline is useful when we start animating. It keeps track of playback options and keyframes.
Blender 2.8 includes two new major pieces of the UI: the Top Bar and the Status Bar. Most of the data that can be seen in these areas isn't new to Blender 2.8; it has just been reorganized into these two bars so that it is always visible:
- Top Bar: The Top Bar is found at the very top of the user interface. The Blender logo can be seen at the top left. Clicking on it will give us the option to reopen the Splash Screen. The Top Bar includes the typical menu options that you'll find in most software, such as File, Edit, and so on. The most exciting feature on the Top Bar is the new Workspace presets, such as Layout, Modeling, Sculpting, and more. These tabs will allow us to quickly rearrange the UI for different workflows.
- Status Bar: The Status Bar can be found at the very bottom of the user interface. It includes helpful hotkey reminders, tool options, a polygon count, and other useful information about the current file. Check here often for reminders of how tools work.
We've broken down the latest version of the UI into its main sections, which means we're ready to take a look at basic navigation in the software.
- Python GUI Programming:A Complete Reference Guide
- 電腦組裝與維修從入門到精通(第2版)
- 計(jì)算機(jī)維修與維護(hù)技術(shù)速成
- 分布式微服務(wù)架構(gòu):原理與實(shí)戰(zhàn)
- 計(jì)算機(jī)組裝與維修技術(shù)
- 微軟互聯(lián)網(wǎng)信息服務(wù)(IIS)最佳實(shí)踐 (微軟技術(shù)開(kāi)發(fā)者叢書)
- Spring Cloud微服務(wù)架構(gòu)實(shí)戰(zhàn)
- Building 3D Models with modo 701
- 筆記本電腦維修實(shí)踐教程
- 單片機(jī)開(kāi)發(fā)與典型工程項(xiàng)目實(shí)例詳解
- 數(shù)字媒體專業(yè)英語(yǔ)(第2版)
- 無(wú)蘋果不生活:OS X Mountain Lion 隨身寶典
- 單片機(jī)技術(shù)及應(yīng)用
- 電腦橫機(jī)使用與維修
- 3D Printing Blueprints