- Unreal Development Kit Game Design Cookbook
- Thomas Mooney
- 586字
- 2021-08-20 15:41:15
Beginning, building, and testing a new level
In versions prior to June 2011 the user was confronted with a blank scene on loading the editor. This is still possible, if one likes that, but there is now also a set of templates to get started quickly. The templates each emulate a certain time of the day (Night, Day, Morning, Afternoon). These are not extensive maps, just a staging point to help move around the space easily and to help make visual prototyping faster. They come with already established lighting (Dominant Directional Light), a sky dome StaticMesh, a LightmassImportanceVolume, and a KillZ height, all of which the user would have to fuss with previously.
How to do it...
- Install UDK post June 2011 and start UDK. Go to the File menu and choose New. Choose the Afternoon Lighting template.

- The map that opens has a large StaticMesh box for the ground, and a small StaticMesh cube where the Builder Brush is. This StaticMesh is not useful except for scale reference, so select and delete it by pressing Delete. You can't delete the red Builder Brush.
- After deleting the box, notice the current lighting (shadows most obviously) doesn't change. Therefore we need to build the scene. Click on the menu Build and choose Build All or press [
 ]. Swarm Agent will start and you can watch it process the scene (in the first instance you may be asked for administrator approval to run this utility). For more information on Swarm, and distributed rendering, consult: http://udn.epicgames.com/Three/Swarm.html.
 - When the Build is finished, which should be fast given the scene simplicity, hit F8 (to Play in Editor (PIE)) or Alt + F8 to play in the active viewport.
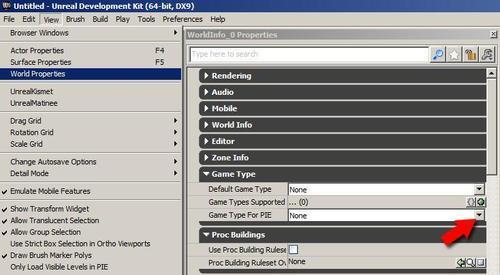
- Notice you have no gun and there's no HUD (Heads-up display). Press Escape to close the play session and return to the editor. This time go to the menu View | World Properties. Under Default Game Type, change None to UTGame and do the same for Game Type for PIE. Press F8 or press [
 ] and this time when you PIE you'll be able to shoot and see a crosshair for aiming and so on.
- Save the map to
C:\UDK\~\UDKGame\Content\Yourfolder\Yourfirstmap.UDK. - If you want to you can set any of your maps as one of the map templates that show when UDK loads. To do this we need to save the map to the folder
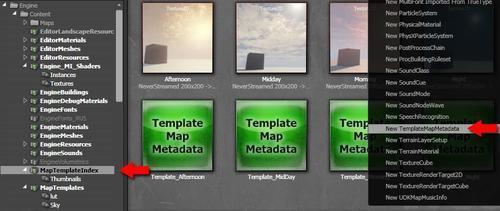
C:\UDK\~\UDKGame\Content\Maps\Templateswhich is a location specifically for templates. In this case use the extension .UMAP, for instance: YourFirstMap.UMAP. - In the Content Browser, locate the folder or package called Engine.Content.MapTemplateIndex. Add your map here by right-clicking in the Content Browser and choosing New TemplateMapMetadata. When the dialog for this opens, give the Info | Name as YourFirstMap (or whatever you saved your .UMAP file as, without including the ending). Click Okay.
- You can add a picture to your newly created TemplateMapMetadata asset. You could take a screen grab and save it as .PNG from Photoshop, and then in the UDK Content Browser right-click and choose Import, and browse to your .PNG. Import the texture to the same package as your TemplateMapMetadata asset.
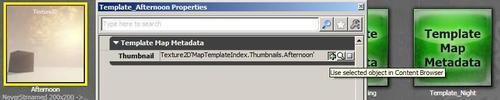
- To complete adding the picture to the template, right-click on the imported texture and choose Copy full name to clipboard. Then find the TemplateMapMetadata asset and double-click it to show its Properties, and in the Thumbnail field of the Template Map Metadata paste the texture name. Save your package and next time you start UDK and choose New Map, yours should appear in the offered templates.
推薦閱讀
- Hands-On Graph Analytics with Neo4j
- ABB工業機器人編程全集
- Google Cloud Platform Cookbook
- 腦動力:PHP函數速查效率手冊
- 樂高機器人—槍械武器庫
- 計算機與信息技術基礎上機指導
- Excel 2007常見技法與行業應用實例精講
- Photoshop行業應用基礎
- Unreal Development Kit Game Design Cookbook
- 電腦故障排除與維護終極技巧金典
- Getting Started with Tableau 2019.2
- 基于Quartus Ⅱ的數字系統Verilog HDL設計實例詳解
- 軟件質量管理實踐
- 工程地質地學信息遙感自動提取技術
- Web滲透技術及實戰案例解析