- Final Cut Pro X Cookbook
- Jason Cox
- 363字
- 2021-08-05 18:53:22
Creating connected clips
Rearranging clips is a fact of life for an editor. As we've seen, the Magnetic Timeline can take a lot of the pain out of the process. But, what if your clips have b-roll and cutaways? Making sure these shots moved along with clips you were trying to rearrange used to take a lot of focus, but no longer. In their quest to reinvent the way you edit, Apple came up with the idea of Connected Clips, a feature that automatically tethers clips outside of the primary storyline to clips inside.
Getting ready
Have a project with a few clips laid down in the timeline.
How to do it...
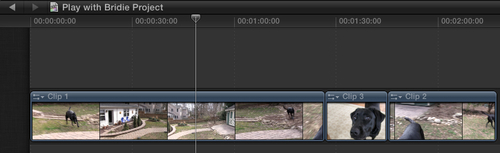
- Place your playhead anywhere over the first clip in the timeline, as shown in the following screenshot:
- Up in your Event Browser, find the clip you want to use as b-roll or a cutaway and select a range or the entire clip.
- Click on the Connect the selected clip to the primary storyline button in the toolbar or hit Q on your keyboard:

- The clip appears above the clip in the primary storyline. Notice the tiny handle attaching the two clips, as shown in the following screenshot:

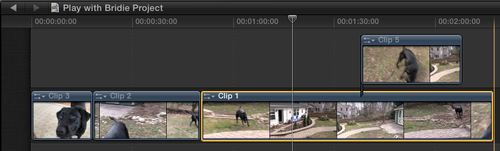
- Click and hold on the clip in the primary storyline, drag it all the way to the end, and let go. Notice that the connected clip came along for the ride, as shown in the following screenshot:
There's more...
You don't always get the placement of your connected clips right at the first time. Luckily, they can be adjusted very easily. Simply click on the clip and drag it to left or right. Independent connected clips aren't bound by the same rules as clips in the primary timeline. Of course, this changes if you add a connected clip to a secondary storyline, so make sure to read the Creating Additional Storylines recipe in Chapter 4, Enhancing Your Editing.
See also
If you're unsure of how we rearranged clips so easily, read the Working with (and without) the Magnetic Timeline recipe. Also, to take connected clips to the next level, read the Creating additional storylines recipe in Chapter 4, Enhancing Your Editing.
- 觸摸屏實(shí)用技術(shù)與工程應(yīng)用
- 24小時學(xué)會電腦組裝與維護(hù)
- ATmega16單片機(jī)項(xiàng)目驅(qū)動教程
- 顯卡維修知識精解
- 龍芯應(yīng)用開發(fā)標(biāo)準(zhǔn)教程
- 電腦常見故障現(xiàn)場處理
- 嵌入式系統(tǒng)中的模擬電路設(shè)計(jì)
- 筆記本電腦應(yīng)用技巧
- 筆記本電腦維修300問
- 無蘋果不生活:OS X Mountain Lion 隨身寶典
- 基于PROTEUS的電路設(shè)計(jì)、仿真與制板
- 電腦組裝與維護(hù)即時通
- 單片機(jī)原理與技能訓(xùn)練
- 筆記本電腦維修技能實(shí)訓(xùn)
- 創(chuàng)客電子:Arduino和Raspberry Pi智能制作項(xiàng)目精選