- Learning jQuery(Fourth Edition)
- Jonathan Chaffer Karl Swedberg
- 792字
- 2021-08-13 17:18:50
Effects and duration
When we include a duration (sometimes also referred to as a speed) with .show() or .hide(), it becomes animated—occurring over a specified period of time. The .hide(duration) method, for example, decreases an element's height, width, and opacity simultaneously until all three reach zero, at which point the CSS rule display: none is applied. The .show(duration) method will increase the element's height from top to bottom, width from the left-hand side to the right-hand side, and opacity from 0 to 1 until its contents are completely visible.
Speeding in
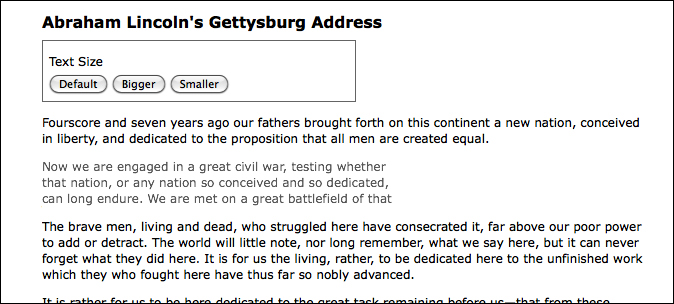
With any jQuery effect, we can use one of the two preset speeds, 'slow' or 'fast'. Using .show('slow') makes the show effect complete in 600 milliseconds (0.6 seconds), .show('fast') in 200 milliseconds. If any other string is supplied, jQuery's default animation duration of 400 milliseconds will be used. For even greater precision, we can specify a number of milliseconds: for example, .show(850). Note that in this case we are specifying a numeric value, so we do not use quotation marks.
Let's include a speed in our example when showing the second paragraph of Lincoln's Gettysburg Address:
$(document).ready(function() {
  $('p').eq(1).hide();
  $('a.more').click(function(event) {
    event.preventDefault();
    $('p').eq(1).show('slow');
    $(this).hide();
  });
});
Listing 4.8
When we capture the paragraph's appearance at roughly halfway through the effect, we see the following:
Fading in and fading out
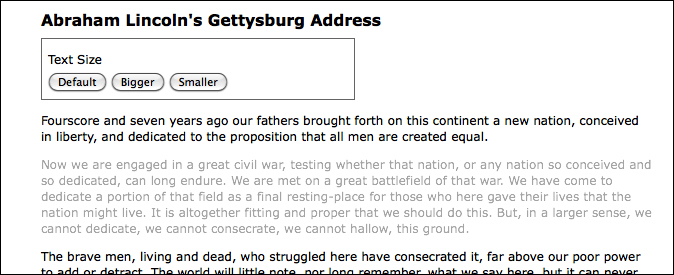
While the animated .show() and .hide() methods are certainly flashy, in practice, they animate more properties than are useful. Fortunately, jQuery offers a couple of other prebuilt animations for a more subtle effect. For example, to have the whole paragraph appear just by gradually increasing the opacity, we can use .fadeIn('slow') instead:
$(document).ready(function() {
  $('p').eq(1).hide();
  $('a.more').click(function(event) {
    event.preventDefault();
    $('p').eq(1).fadeIn('slow');
    $(this).hide();
  });
});
Listing 4.9
Now when we look at the paragraph during the effect, it looks like this:
The difference here is that the .fadeIn() effect starts by setting the dimensions of the paragraph so that the contents can simply fade into it. To gradually decrease the opacity we can use .fadeOut().
Sliding up and sliding down
The fading animations are very useful for items that are outside the flow of the document. For example, these are typical effects to apply to "lightbox" elements that are overlaid on the page. However, when an element is part of the document flow, calling .fadeIn() on it causes the document to jump to provide the real estate needed for the new element, which is not always aesthetically pleasing.
In these cases, jQuery's .slideDown() and .slideUp() methods are often the right choice. These effects animate only the height of the selected elements. To have our paragraph appear using a vertical slide effect, we can call .slideDown('slow'):
$(document).ready(function() {
  $('p').eq(1).hide();
  $('a.more').click(function(event) {
    event.preventDefault();
    $('p').eq(1).slideDown('slow');
    $(this).hide();
  });
});
Listing 4.10
This time when we examine the paragraph at the animation's midpoint, we see the following:

To reverse the effect, we would instead call .slideUp().
Toggling visibility
Sometimes we have a need to toggle the visibility of elements, rather than displaying them once as we have done in the previous examples. This toggling can be achieved by first checking the visibility of the matched elements and then calling the appropriate method. Using the fade effects again, we can modify the example script to look like this:
$(document).ready(function() {
  var $firstPara = $('p').eq(1);
  $firstPara.hide();
  $('a.more').click(function(event) {
    event.preventDefault();
    if ($firstPara.is(':hidden')) {
      $firstPara.fadeIn('slow');
      $(this).text('read less');
    } else {
      $firstPara.fadeOut('slow');
      $(this).text('read more');
    }
  });
});
Listing 4.11
As we did earlier in the chapter, we're caching our selector here to avoid repeated DOM traversal. Notice too that we're no longer hiding the clicked link; instead, we're changing its text.
Tip
To examine the text contained by an element and to change that text, we're using the .text() method. We will delve into this method more fully in Chapter 5, Manipulating the DOM.
Using an if-else statement is a perfectly reasonable way to toggle elements' visibility. But with jQuery's compound effect methods, we can remove some conditional logic from our code. jQuery provides a .toggle() method, which acts like .show() and .hide(), and like them, it can be used with or without a duration argument. Other compound methods include .fadeToggle() and .slideToggle(), which show or hide elements using the corresponding effects. Here is what the script looks like when we use the .slideToggle() method:
$(document).ready(function() {
  var $firstPara = $('p').eq(1);
  $firstPara.hide();
  $('a.more').click(function(event) {
    event.preventDefault();
    $firstPara.slideToggle('slow');
    var $link = $(this);
    if ($link.text() == 'read more') {
      $link.text('read less');
    } else {
      $link.text('read more');
    }
  });
});
Listing 4.12
To reduce repetition of $(this), we're storing the result in the $link variable for performance and readability. Also, the conditional statement checks for the text of the link rather than the visibility of the second paragraph, since we're only using it to change the text.
- C語言程序設計案例教程
- 復雜軟件設計之道:領域驅動設計全面解析與實戰
- Building a RESTful Web Service with Spring
- Java性能權威指南(第2版)
- Unity 5.x By Example
- Unity 2D Game Development Cookbook
- 軟件測試實用教程
- OpenCV with Python By Example
- 快速入門與進階:Creo 4·0全實例精講
- Access 2010數據庫應用技術實驗指導與習題選解(第2版)
- Kubernetes進階實戰
- Python網絡爬蟲技術與應用
- JBoss AS 7 Development
- JavaScript語法簡明手冊
- Mathematica Data Visualization