- Learning jQuery(Fourth Edition)
- Jonathan Chaffer Karl Swedberg
- 873字
- 2021-08-13 17:18:48
Event propagation
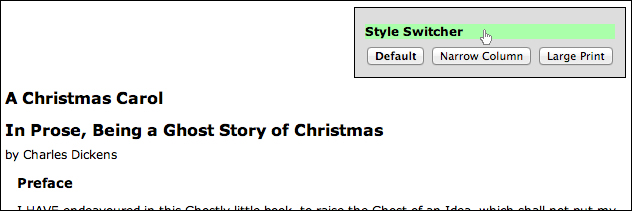
In illustrating the ability of the click event to operate on normally non-clickable page elements, we have crafted an interface that gives few hints that the style switcher label—actually just an <h3> element—is actually a live part of the page awaiting user interaction. To remedy this, we can give it a rollover state, making it clear that it interacts in some way with the mouse:
.hover {
  cursor: pointer;
  background-color: #afa;
}
The CSS specification includes a pseudo-class called :hover, which allows a stylesheet to affect an element's appearance when the user's mouse cursor hovers over it. This would certainly solve our problem in this instance, but instead, we will take this opportunity to introduce jQuery's .hover() method, which allows us to use JavaScript to change an element's styling—and indeed, perform any arbitrary action—both when the mouse cursor enters the element and when it leaves the element.
The .hover() method takes two function arguments, unlike the simple event methods we have so far encountered. The first function will be executed when the mouse cursor enters the selected element, and the second is fired when the cursor leaves. We can modify the classes applied to the buttons at these times to achieve a rollover effect:
$(document).ready(function() {
  $('#switcher h3').hover(function() {
    $(this).addClass('hover');
  }, function() {
    $(this).removeClass('hover');
  });
});
Listing 3.10
We once again use implicit iteration and event context for short and simple code. Now when hovering over the <h3> element, we see our class applied:
The use of .hover() also means we avoid headaches caused by event propagation in JavaScript. To understand this, we need to take a look at how JavaScript decides which element gets to handle a given event.
The journey of an event
When an event occurs on a page, an entire hierarchy of DOM elements gets a chance to handle the event. Consider a page model like the following:
<div class="foo">
  <span class="bar">
    <a >
      The quick brown fox jumps over the lazy dog.
    </a>
  </span>
  <p>
    How razorback-jumping frogs can level six piqued gymnasts!
  </p>
</div>
We then visualize the code as a set of nested elements:
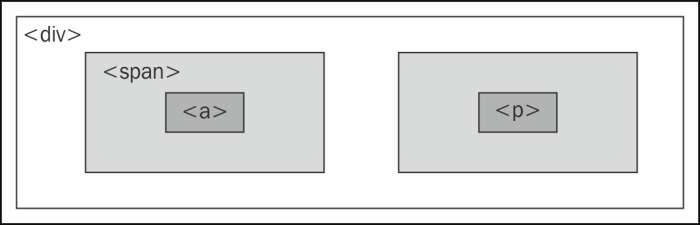
For any event, there are multiple elements that could logically be responsible for reacting. When the link on this page is clicked, for example, the <div>, <span>, and <a> elements should all get the opportunity to respond to the click. After all, these three elements are all under the user's mouse cursor at the time. The <p> element, on the other hand, is not part of this interaction at all.
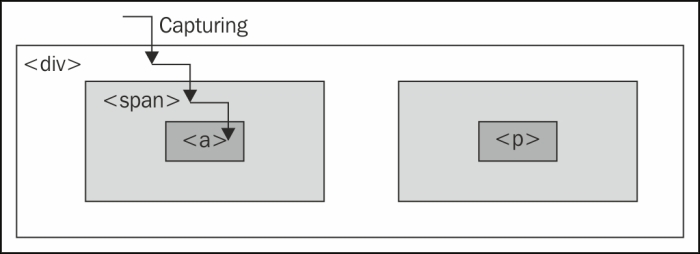
One strategy for allowing multiple elements to respond to a user interaction is called event capturing. With event capturing, the event is first given to the most all-encompassing element, and then to progressively more specific ones. In our example, this means that first the <div> element gets passed the event, then the <span> element, and finally the <a> element, as shown in the following figure:
Note
Technically, in browser implementations of event capturing, specific elements register to listen for events that occur among their descendants. The approximation provided here is close enough for our needs.
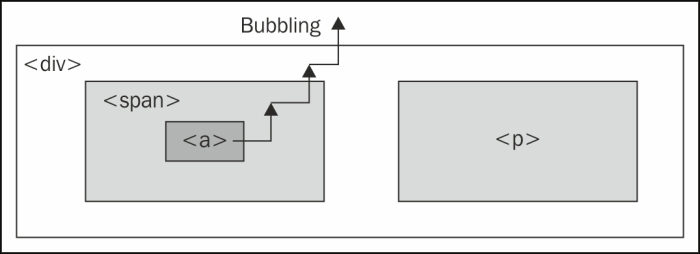
The opposite strategy is called event bubbling. The event gets sent to the most specific element, and after this element has an opportunity to react, the event bubbles up to more general elements. In our example, the <a> element would be handed the event first, and then the <span> and <div> elements in that order, as shown in the following figure:
Unsurprisingly, different browser developers originally decided on different models for event propagation. The DOM standard that was eventually developed thus specified that both strategies should be used: first the event is captured from general elements to specific ones, and then the event bubbles back up to the top of the DOM tree. Event handlers can be registered for either part of the process.
To provide consistent and easy-to-understand behavior, jQuery always registers event handlers for the bubbling phase of the model. We can always assume that the most specific element will get the first opportunity to respond to any event.
Side effects of event bubbling
Event bubbling can cause unexpected behavior, especially when the wrong element responds to a mouseover or mouseout event. Consider a mouseout event handler attached to the <div> element in our example. When the user's mouse cursor exits the <div> element, the mouseout handler is run as anticipated. Since this is at the top of the hierarchy, no other elements get the event. On the other hand, when the cursor exits the <a> element, a mouseout event is sent to that. This event will then bubble up to the <span> element and then to the <div> element, firing the same event handler. This bubbling sequence is likely not desired.
The mouseenter and mouseleave events, either bound individually or combined in the .hover() method, are aware of these bubbling issues, and when we use them to attach events, we can ignore the problems caused by the wrong element getting a mouseover or mouseout event.
The mouseout scenario just described illustrates the need to constrain the scope of an event. While .hover() handles this specific case, we will encounter other situations in which we need to limit an event spatially (preventing the event from being sent to certain elements) or temporally (preventing the event from being sent at certain times).
- 密碼學(xué)原理與Java實(shí)現(xiàn)
- Python 深度學(xué)習(xí)
- Magento 2 Theme Design(Second Edition)
- 數(shù)據(jù)結(jié)構(gòu)簡明教程(第2版)微課版
- Silverlight魔幻銀燈
- Nginx Essentials
- Python Data Analysis(Second Edition)
- 從Java到Web程序設(shè)計(jì)教程
- Learning OpenStack Networking(Neutron)(Second Edition)
- AIRIOT物聯(lián)網(wǎng)平臺(tái)開發(fā)框架應(yīng)用與實(shí)戰(zhàn)
- HTML5秘籍(第2版)
- Android開發(fā)三劍客:UML、模式與測試
- Test-Driven JavaScript Development
- HTML5+CSS3+JavaScript 從入門到項(xiàng)目實(shí)踐(超值版)
- 從Excel到Python數(shù)據(jù)分析:Pandas、xlwings、openpyxl、Matplotlib的交互與應(yīng)用