- AngularJS Web Application Development Blueprints
- Vinci Rufus
- 1874字
- 2021-09-03 09:51:21
Setting up Grunt
Grunt is a JavaScript-based task runner. It is primarily used for automating tasks such as running unit tests, concatenating, merging, and minifying JS and CSS files. You can also run shell commands. This makes it super easy to perform server cleanups and deploy code. Essentially, Grunt is to JavaScript what Rake would be to Ruby or Ant/Maven would be to Java.
Installing Grunt-cli
Installing Grunt-cli is slightly different from installing other Node.js modules. We first need to install the Grunt's Command Line Interface (CLI) by firing the following command in the terminal:
npm install -g grunt-cli
Mac or Linux users can also directly run the following command:
sudo npm install –g grunt-cli
Make sure you have administrative privileges. Use sudo if you are on a Mac or Linux system. If you are on Windows, right-click and open the command prompt with administrative rights. An important thing to note is that installing Grunt-cli doesn't automatically install Grunt and its dependencies.
Grunt-cli merely invokes the version of Grunt installed along with the Grunt file. While this may seem a little complicated at start, the reason it works this way is so that we can run different versions of Grunt from the same machine. This comes in handy when your project has dependencies on a specific version of Grunt.
Creating the package.json file
To install Grunt first, let's create a folder called my-project and create a file called package.json with the following content:
{
  "name": "My-Project",
  "version": "0.1.0",
  "devDependencies": {
    "grunt": "~0.4.5",
    "grunt-contrib-jshint": "~0.10.0",
    "grunt-contrib-concat": "~0.4.0",
    "grunt-contrib-uglify": "~0.5.0",
"grunt-shell": "~0.7.0"

  }
}
Save the file. The package.json is where you define the various parameters of your app; for example, the name of your app, the version number, and the list of dependencies needed for the app.
Here we are calling our app My-Project with Version 0.1.0, and listing out the following dependencies that need to be installed as a part of this app:
grunt(v0.4.5): This is the main Grunt applicationgrunt-contrib-jshint(v0.10.0): This is used for code analysisgrunt-contrib-concat(v0.4.0): This is used to merge two or more files into onegrunt-contrib-uglify(v0.5.0): This is used to minify the JS filegrunt-shell(v0.7.0): This is the Grunt shell used for running shell commands
Visit a list of all the plugins available for Grunt and also their exact names and version numbers.
Note
You may also choose to create a default package.json file by running the following command and answering the questions:
npm init
Open the package.json file and add the dependencies as mentioned earlier.
Now that we have the package.json file, load the terminal and navigate into the my-project folder. To install Grunt and the modules specified in the file, type in the following command:
npm install --save-dev
You'll see a series of lines getting printed in the console, let that continue for a while and wait until it returns to the command prompt. Ensure that the last line printed by the previous command ends with OK code 0.
Once Grunt is installed, a quick version check command will ensure that Grunt is installed. The command is as follows:
grunt –-version
There is a possibility that you got a bunch of errors and it ended with a not ok code 0 message. There could be multiple reasons why that would have happened, ranging from errors in your code to a network connection issue or something changing at Grunt's end due to a new version update.
If grunt --version throws up an error, it means Grunt wasn't installed properly. To reinstall Grunt, enter the following commands in the terminal:
rm –rf node_modules
npm cache clean
npm install
Windows users may manually delete the node_modules folder from Windows Explorer, before running the cache clean command in the command prompt.
Tip
Refer to http://www.gruntjs.com to troubleshoot the problem.
Creating your Grunt tasks
To run our Grunt tasks, we'll need a JavaScript file. So, let's copy our scritps.js from the previous chapter and place it into the my-projects folder.
The next step is to create a Grunt file that will list out the tasks that we need Grunt to perform.
For now, we will ask it to do four simple tasks, first check if our JS code is clean using JSHint, then we will merge three JS files into one and then minify the JS file, and finally we will run some shell commands to clean up.
Note
Until Version 0.3, the init command was a part of the Grunt tool and one could create a blank project using grunt-init. With Version 0.4, init is now available as a separate tool called grunt-init and needs to be installed using the npm install –g grunt-init command line. Also note that the structure of the grunt.js file from Version 0.4 onwards is fairly different from the earlier versions you've used.
For now, we will resort to creating the Grunt file manually. Refer to the following screenshot:
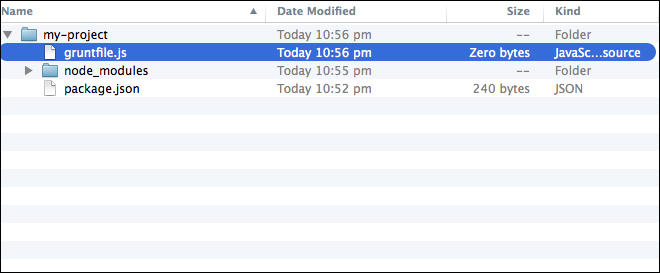
In the same location as where you have your package.json, create a file called gruntfile.js as shown earlier and type in the following code:
module.exports = function(grunt) {
    // Project configuration.
    grunt.initConfig({

 jshint:{
    all:['scripts.js']
 }
     });

    grunt.loadNpmTasks('grunt-contrib-jshint');
// Default task.
grunt.registerTask('default', ['jshint']);
};
To start, we will add only one task which is jshint and specify scripts.js in the list of files that need to be linted. In the next line, we specify grunt-contrib-jshint as the npm task that needs to be loaded. In the last line, we define the jshint as the task to be run when Grunt is running in default mode. Save the file and in the terminal run the following command:
grunt
You would probably get to see the following message in the terminal:
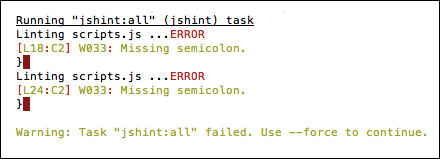
So JSHint is saying that we are missing a semicolon on lines 18 and 24. Oh! Did I mention that JSHint is like your very strict math teacher from high school.
Let's open up scripts.js and put in those semicolons and rerun Grunt. Now you should get a message in green saying 1 file lint free. Done without errors.
Let's add some more tasks to Grunt. We'll now ask it to concatenate and minify a couple of JS files. Since we currently have just one file, let's go and create two dummy JS files called scripts1.js and scripts2.js.
In scripts1.js we'll simply write an empty function as follows:
// This is from script 1
function Script1Function(){
   //------//
}
Similarly, in scripts2.js we'll write the following:
// This is from script 2
function Script2Function(){
   //------//
}
Save these files in the same folder where you have scripts.js.
Grunt tasks to merge and concatenate files
Now, let's open our Grunt file and add the code for both the tasks—to merge the JS file, and minify them as follows:
module.exports = function(grunt) {

    // Project configuration.
    grunt.initConfig({

 jshint:{
    all:['scripts.js']
 },

 concat: {
 dist: {
 src: ['scripts.js', 'scripts1.js','scripts2.js'],
 dest: 'merged.js'
 }
 },

uglify: {
 dist: {
 src: 'merged.js',
 dest: 'build/merged.min.js'
 }
 }
    });

grunt.loadNpmTasks('grunt-contrib-jshint');
grunt.loadNpmTasks('grunt-contrib-concat');
grunt.loadNpmTasks('grunt-contrib-uglify');

// Default task.
grunt.registerTask('default', ['jshint','concat','uglify']);

};
As you can see from the preceding code, after the jshint task, we added the concat task. Under the src attribute, we define the files separated by a comma that need to be concatenated. And in the dest attribute, we specify the name of the merged JS file.
Tip
It is very important that the files are entered in the same sequence as they need to be merged. If the sequence of the files entered is incorrect, the merged JS file will cause errors in your app.
The uglify task is used to minify the JS file and the structure is very similar to the concat task. We add the merged.js file to the src attribute and in the dest attribute, we will place the merged.min.js file into a folder called build.
Note
Grunt will auto create the build folder.
After defining the tasks, we will load the necessary plugins, namely the grunt-contrib-concat and the grunt-contrib-uglify, and finally we will register the concat and uglify tasks to the default task.
Save the file and run Grunt. And if all goes well, you should see Grunt running these tasks and informing the status of each of the tasks.
If you get the final message saying, Done, without any errors, it means things went well, and this was your lucky day!
If you now open your my-project folder in the file manager, you should see a new file called merged.js. Open it in the text editor and you'll notice that all the three files have been merged into this. Also, go into the build/merged.min.js file and verify whether the file is minified.
Running shell commands via Grunt
Another really helpful plugin in Grunt is grunt-shell. This allows us to effectively run clean-up activities such as deleting .tmp files and moving files from one folder to another.
Let's see how to add the shell tasks to our Grunt file. Add the following highlighted piece of code to your Grunt file:
module.exports = function(grunt) {

    // Project configuration.
    grunt.initConfig({

 jshint:{
    all:['scripts.js']
 },

 concat: {
   dist: {
       src: ['scripts.js', 'scripts1.js','scripts2.js'],
       dest: 'merged.js'
            }
       },

uglify: {
   dist: {
   src: 'merged.js',
   dest: 'build/merged.min.js'
            }
       } ,

shell: {
 multiple: {
 command: [
 'rm -rf merged.js',
 'mkdir deploy',
 'mv build/merged.min.js deploy/merged.min.js'
 ].join('&&')
 }
}
    });

grunt.loadNpmTasks('grunt-contrib-jshint');
grunt.loadNpmTasks('grunt-contrib-concat');
grunt.loadNpmTasks('grunt-contrib-uglify');
grunt.loadNpmTasks('grunt-shell');

// Default task.
grunt.registerTask('default', ['jshint','concat','uglify','shell']);

};
As you can see from the code we added, we are first deleting the merged.js file, then creating a new folder called deploy and moving our merged.min.js file into it. Windows users would need to use the appropriate DOS commands for deleting and copying the files.
Note that .join('&&') is used when you want Grunt to run multiple shell commands. The next steps are to load the npm tasks and add shell to the default task list. To see Grunt perform all these tasks, run the Grunt command in the terminal.
Once it's done, open up the filesystem and verify whether Grunt has done what you had asked it to do. Just like we used the preceding four plugins, there are numerous other plugins that you can use with Grunt to automate your tasks.
A point to note is while the default Grunt command will run all the tasks mentioned in the grunt.registerTask statement, if you would need to run a specific task instead of all of them, then you can simply type the following in the command line:
grunt jshint
Alternatively, you can type the following command:
grunt concat
Alternatively, you can type the following command:
grunt ugligy
At times if you'd like to run just two of the three tasks, then you can register them separately as another bundled task in the Grunt file. Open up the gruntfile.js file, and just after the line where you have registered the default task, add the following code:
grunt.registerTask('concat-min', ['concat','uglify']);
This will register a new task called concat-min and will run only the concat and uglify tasks.
In the terminal run the following command:
grunt concat-min
Verify whether Grunt only concatenated and minified the file and didn't run JSHint or your shell commands.
Tip
You can run grunt --help to see a list of all the tasks available in your Grunt file.
- C# Programming Cookbook
- Vue.js入門與商城開發實戰
- MySQL數據庫管理與開發實踐教程 (清華電腦學堂)
- 人人都是網站分析師:從分析師的視角理解網站和解讀數據
- Elasticsearch for Hadoop
- SQL Server從入門到精通(第3版)
- Unity 3D/2D移動開發實戰教程
- 智能搜索和推薦系統:原理、算法與應用
- Illustrator CC平面設計實戰從入門到精通(視頻自學全彩版)
- Clojure for Java Developers
- Java 從入門到項目實踐(超值版)
- Python 快速入門(第3版)
- 程序員的英語
- Building Web and Mobile ArcGIS Server Applications with JavaScript(Second Edition)
- H5頁面設計與制作(全彩慕課版·第2版)