- Python GUI Programming Cookbook
- Burkhard A. Meier
- 400字
- 2021-07-30 10:08:22
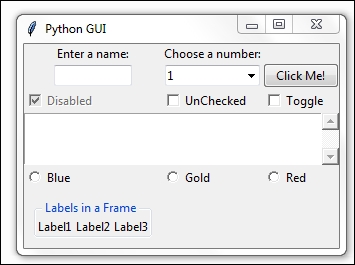
Arranging several labels within a label frame widget
The LabelFrame widget allows us to design our GUI in an organized fashion. We are still using the grid layout manager as our main layout design tool, yet by using LabelFrame widgets we get much more control over our GUI design.
Getting ready
We are starting to add more and more widgets to our GUI, and we will make the GUI fully functional in the coming recipes. Here, we are starting to use the LabelFrame widget. We will reuse the GUI from the last recipe of the previous chapter.
How to do it...
Add the following code just above the main event loop towards the bottom of the Python module:
# Create a container to hold labels
labelsFrame = ttk.LabelFrame(win, text=' Labels in a Frame ') # 1
labelsFrame.grid(column=0, row=7)

# Place labels into the container element # 2
ttk.Label(labelsFrame, text="Label1").grid(column=0, row=0)
ttk.Label(labelsFrame, text="Label2").grid(column=1, row=0)
ttk.Label(labelsFrame, text="Label3").grid(column=2, row=0)

# Place cursor into name Entry
nameEntered.focus()
Note
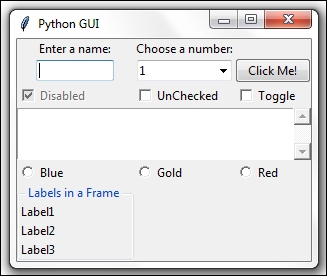
We can easily align the labels vertically by changing our code, as shown next. Note that the only change we had to make was in the column and row numberings.
# Place labels into the container element – vertically # 3
ttk.Label(labelsFrame, text="Label1").grid(column=0, row=0)
ttk.Label(labelsFrame, text="Label2").grid(column=0, row=1)
ttk.Label(labelsFrame, text="Label3").grid(column=0, row=2)
How it works...
Comment # 1: Here, we will create our first ttk LabelFrame widget and give the frame a name. The parent container is win, our main window.
The three lines following comment # 2 create label names and place them in the LabelFrame. We are using the important grid layout tool to arrange the labels within the LabelFrame. The column and row properties of this layout manager give us the power to control our GUI layout.
Note
The parent of our labels is the LabelFrame, not the win instance variable of the main window. We can see the beginning of a layout hierarchy here.
The highlighted comment # 3 shows how easy it is to change our layout via the column and row properties. Note how we change the column to 0, and how we layer our labels vertically by numbering the row values sequentially.
Note
The name ttk stands for "themed tk". The tk-themed widget set was introduced in Tk 8.5.
There's more...
In a recipe later in this chapter, we will embed LabelFrame(s) within LabelFrame(s), nesting them to control our GUI layout.
- Intel FPGA/CPLD設(shè)計(基礎(chǔ)篇)
- ATmega16單片機項目驅(qū)動教程
- 圖解西門子S7-200系列PLC入門
- Linux KVM虛擬化架構(gòu)實戰(zhàn)指南
- 電腦軟硬件維修大全(實例精華版)
- 精選單片機設(shè)計與制作30例(第2版)
- micro:bit魔法修煉之Mpython初體驗
- 電腦軟硬件維修從入門到精通
- 計算機組裝與維修技術(shù)
- 固態(tài)存儲:原理、架構(gòu)與數(shù)據(jù)安全
- 單片機系統(tǒng)設(shè)計與開發(fā)教程
- 單片機開發(fā)與典型工程項目實例詳解
- 單片機技術(shù)及應(yīng)用
- STM32自學(xué)筆記
- 單片機原理與技能訓(xùn)練