- Visualforce Development Cookbook(Second Edition)
- Keir Bowden
- 789字
- 2021-07-14 10:08:37
Passing parameters between Visualforce pages
If a user is redirected from one Visualforce page to another and they both share the same controller and extensions, the controller instance will be retained and re-used, allowing the second page to access any information captured by the first.
If the pages do not share the same controller and extensions, the controller instance will be discarded and the second page will have no access to any information captured by the first. If the state needs to be maintained across the pages in this case, it must be encapsulated in the parameters on the URL of the second page.
In this recipe, we will build on the example from the previous recipe to create a Visualforce search page to retrieve all accounts where the name contains a string entered by the user, and provide a way for the user to edit selected fields on all the accounts returned by the search. The record IDs of the accounts to edit will be passed as parameters on the URL to the edit page.
How to do it...
As the search page makes reference to the edit page, the edit page and associated custom controller must be created first:
- Navigate to the Apex Classes setup page by clicking on Your Name|Setup|Develop|Apex Classes.
- Click on the New button.
- Paste the contents of the
EditFromSearchController.clsApex class from the code download into the Apex Class area. - Click on the Save button.
- Next, create the edit Visualforce page by navigating to the Visualforce setup page, clicking on Your Name|Setup|Develop|Visualforce Pages.
- Click on the New button.
- Enter
EditFromSearchin the Label field. - Accept the default EditFromSearch that is automatically generated for the Name field.
- Paste the contents of the
EditFromSearch.pagefile from the code download into the Visualforce Markup area. - Click on the Save button to save the page.
- Navigate to the Visualforce setup page by clicking on Your Name|Setup|Develop|Visualforce Pages.
- Locate the entry for the EditFromSearch page and click on the Security link.
- On the resulting page, select which profiles should have access and click the Save button.
- Next, create the search page by navigating to the Apex Classes setup page, clicking on Your Name|Setup|Develop|Apex Classes.
- Click on the New button.
- Paste the contents of the
SearchAndEditController.clsApex class from the code download into the Apex Class area. - Click on the Save button.
- Next, create the Visualforce page by navigating to the Visualforce setup page, clicking on Your Name|Setup|Develop|Visualforce Pages.
- Click on the New button.
- Enter
SearchAndEditin the Label field. - Accept the default SearchAndEdit that is automatically generated for the Name field.
- Paste the contents of the
SearchAndEdit.pagepage from the code download into the Visualforce Markup area. - Click on the Save button to save the page.
- Navigate to the Visualforce setup page by clicking on Your Name|Setup | Develop|Visualforce Pages.
- Locate the entry for the SearchAndEdit page and click on the Security link.
- On the resulting page, select which profiles should have access and click on the Save button.
How it works...
Opening the following URL in your browser retrieves all accounts where the name field contains the string United : https://<instance>/apex/SearchAndEdit?name=United.
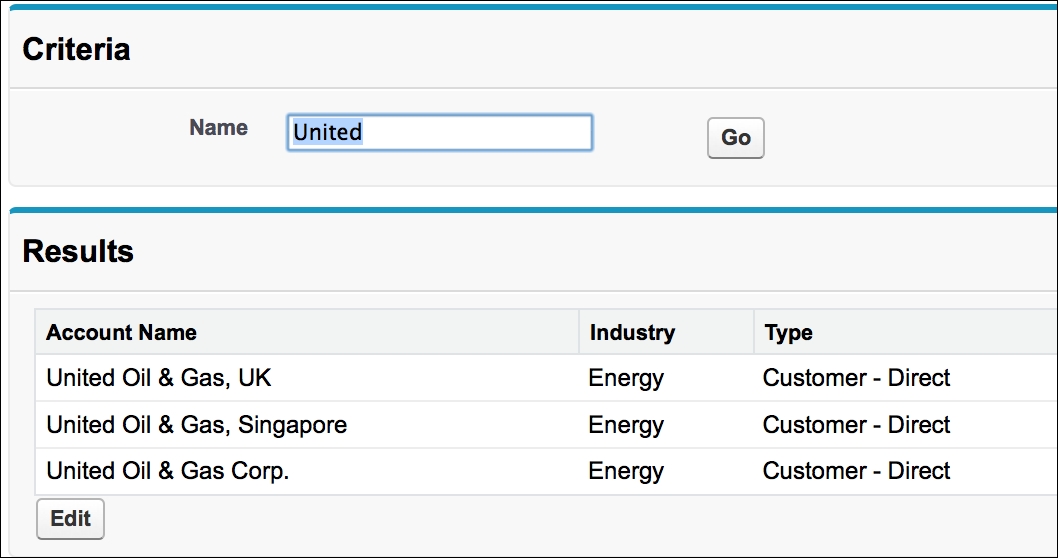
Here, <instance> is the Salesforce instance specific to your organization, for example, na6.salesforce.com.
Notice that the page contains an Edit button, and clicking on this executes the following action method:
public PageReference edit()
{
  PageReference pr=Page.EditFromSearch;
  Integer idx=1;
  for (Account acc : accounts)
  {
    pr.getParameters().put('account' + idx, acc.id);
    idx++;
  }

  return pr;
}
This method initially creates a page reference for the edit page-EditFromSearch. It then iterates the accounts in the search results and adds an entry to the page reference parameters for the account ID. Each parameter has the name account, concatenated with the index of the result, starting from 1. This will result in a URL of the form https://<instance>/apex/EditFromSearch?account1=001i0000006OVLIAA4&account2=001i0000006OVLJAA4.
The EditFromSearch page then renders a form with an editable row per account:
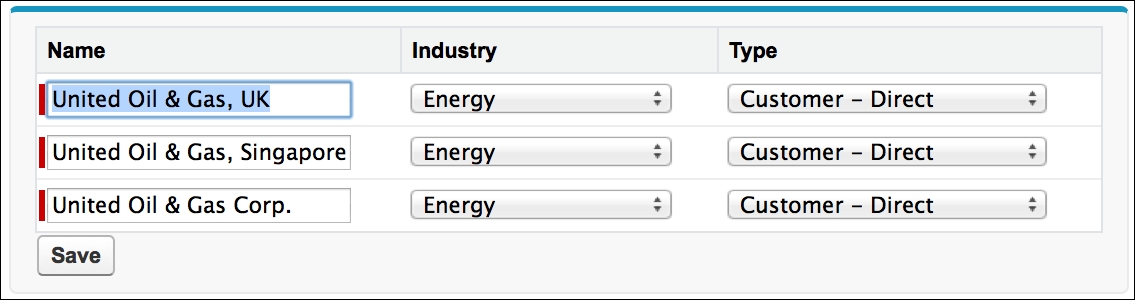
The constructor of EditFromSearchController that manages the data for the page extracts the IDs from the URL and adds them to a list, starting with account1, until it hits a parameter index that is not present in the URL:
Integer idx=1;
String accStr;
do
{
  accStr=ApexPages.currentPage().getParameters().
get('account' + idx);
  if (accStr!=null)
  {
    ids.add(accStr);
  }
  idx++;
}
while (null!=accStr);
The action method that saves the user's edits redirects them to the standard account tab once the save is complete:
return new PageReference('/001/o');
Note
Note that accessing the standard tab via this URL is not supported by Salesforce, and if the URL scheme or three-character prefix for account (001) were to change, this redirection would stop working.
See also
- The Reacting to URL parameters recipe in this chapter shows how a controller can process URL parameters prior to rendering a Visualforce page.