- Test-Driven Java Development(Second Edition)
- Alex Garcia Viktor Farcic
- 427字
- 2021-06-24 18:31:45
Vagrant
Vagrant is the tool we are going to use for creating the development environment stack. It is an easy way to initialize ready-to-go virtual machines with minimum effort using preconfigured boxes. All boxes and configurations are placed in one file, called the Vagrant file.
Here is an example of creating a simple Ubuntu box. We made an extra configuration for installing MongoDB using Docker (the usage of Docker will be explained shortly). We assume that you have VirtualBox (https://www.virtualbox.org) and Vagrant (https://www.vagrantup.com) installed on your computer and that you have internet access.
In this particular case, we are creating an instance of Ubuntu 64-bits using the Ubuntu box (ubuntu/trusty64) and specifying that the VM should have 1 GB of RAM:
  config.vm.box = "ubuntu/trusty64"

  config.vm.provider "virtualbox" do |vb|
  vb.memory = "1024"
  end
Further on, we're exposing MongoDB's default port in the Vagrant machine and running it using Docker:
  config.vm.network "forwarded_port", guest: 27017, host: 27017
  config.vm.provision "docker" do |d|
    d.run "mongoDB", image: "mongo:2", args: "-p 27017:27017"
  end
Finally, in order to speed up the Vagrant setup, we're caching some resources. You should install the plugin called cachier. For further information, visit: https://github.com/fgrehm/vagrant-cachier.
  if Vagrant.has_plugin?("vagrant-cachier")
    config.cache.scope = :box
  end
Now it's time to see it working. It usually takes a few minutes to run it for the first time because the base box and all the dependencies need to be downloaded and installed:
$> vagrant plugin install vagrant-cachier
$> git clone https://bitbucket.org/vfarcic/tdd-java-ch02-example-vagrant.git
$> cd tdd-java-ch02-example-vagrant
$> vagrant up
When this command is run, you should see the following output:
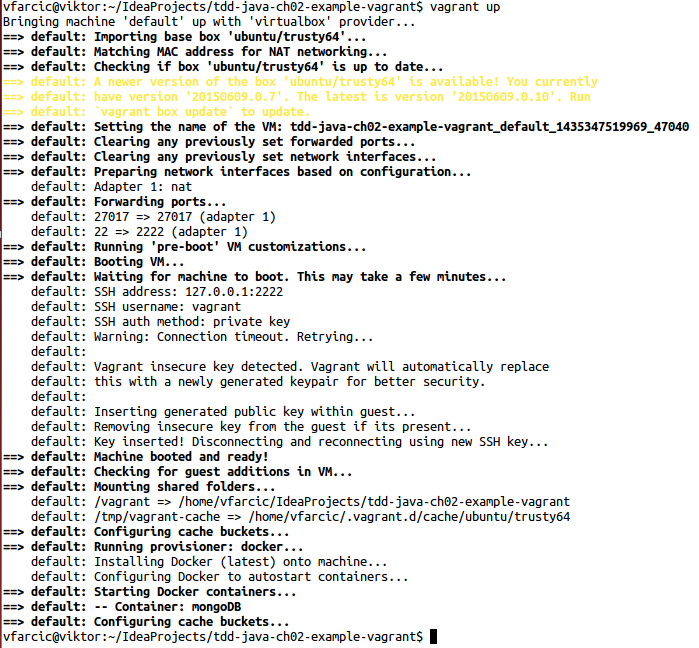
Be patient until the execution is finished. Once done, you'll have a new virtual machine with Ubuntu, Docker, and one MongoDB instance up and running. The best part is that all this was accomplished with a single command.
To see the status of the currently running VM, we can use the status argument:
$> vagrant status
Current machine states:
default                   running (virtualbox)
The virtual machine can be accessed either through ssh or by using Vagrant commands, as in the following example:
$> vagrant ssh
Welcome to Ubuntu 14.04.2 LTS (GNU/Linux 3.13.0-46-generic x86_64)

 * Documentation:  https://help.ubuntu.com/

 System information disabled due to load higher than 1.0

 Get cloud support with Ubuntu Advantage Cloud Guest:
  http://www.ubuntu.com/business/services/cloud

 0 packages can be updated.
 0 updates are security updates.

vagrant@vagrant-ubuntu-trusty-64:~$
Finally, to stop the virtual machine, exit from it and run the vagrant halt command:
$> exit
$> vagrant halt
  ==> default: Attempting graceful shutdown of VM...
$>
- TestNG Beginner's Guide
- Python從入門到精通(精粹版)
- Python網絡爬蟲從入門到實踐(第2版)
- Python編程完全入門教程
- 機械工程師Python編程:入門、實戰與進階
- Building a Quadcopter with Arduino
- 飛槳PaddlePaddle深度學習實戰
- 量化金融R語言高級教程
- Python深度學習:基于TensorFlow
- BeagleBone Black Cookbook
- 從零開始學C語言
- Mastering Data Mining with Python:Find patterns hidden in your data
- HTML5+CSS3+jQuery Mobile APP與移動網站設計從入門到精通
- 單片機原理及應用技術
- HTML5+CSS3+JavaScript 從入門到項目實踐(超值版)